Real World Rides: Honda Talon, Tucson Episode 2
Also posted to:
Real World Rides: Honda Talon, Tucson – Accessorizing the Honda Talon 1000R
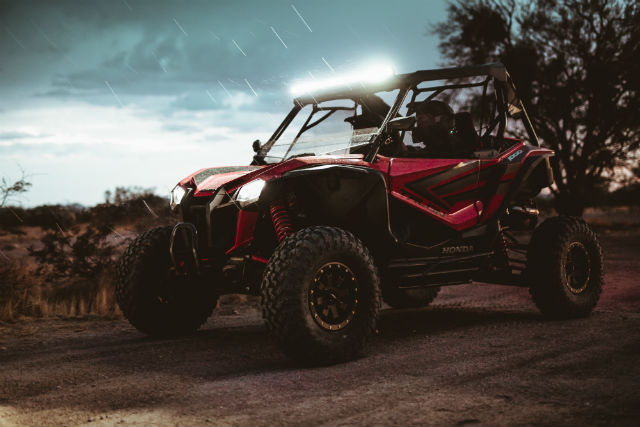
The fully built Honda Talon enjoyed a summer monsoon after we bolted on a bunch of accessories.
Welcome to the second installment of our Real World Rides: Honda Talon, Tucson experience with Brent and Haley Culbertson of Tucson, Arizona.
Welcome Back
Brent and Haley Culbertson are young, married professionals from Tucson, Arizona. They are in the market for a performance SXS and we picked them to be the subjects of our first Real World Rides series here at UTVvideos.net. Here, we’re giving them the full editorial treatment and letting them tell you (and us) what they think of the Honda Talon 1000R from a real customer’s perspective.
If you’re just joining in, you can catch up by reading and watching our Real World Rides: Honda Talon, Tucson Preview, and Real World Rides: Honda Talon, Tucson Episode 1 right here on UTVvideos.net. There, you’ll find a nice overview of our story concept, a good comparison between the Honda Talon 1000R and Honda Talon 1000X (and why we chose the Honda Talon 1000R), features and benefits info as well as our first video episode(of three).
In our first episode, we introduce the Honda Talon 1000R to Brent and Haley and let them take it out for a day trip close to their hometown. If you missed it, go back watch the first episode video and read about the introduction to the Honda Talon 1000R for Brent and Haley’s first impressions. It’s worth a few minutes!
Let’s Start Building
We invaded the private garage of Brent and Haley to build out their Honda Talon test ride.
Up to this point, Brent and Haley have been learning about, and driving, a mostly stock Honda Talon 1000R. Honda’s media department had a half-windshield, nice A-arm guards, and beefy tubular nerf bars on this test vehicle when we picked it up. All of those additions are things we’d do to our Talon if we bought one, too. And since outfitting and customizing SXS’s is in the sports DNA, we thought it’d be fun to bring more parts with us to Tucson.
We selected the most reasonable accessories from Honda’s Parts and Accessories division for installation. And if Honda didn’t make something we wanted to try, we brought that along, too.
This isn’t a full race rig build, or even an over-the-top, magazine-style, build-off behemoth with no regard for real people’s budgets. We wanted to accessorize the Honda Talon 1000R within reason, add things people would actually do to improve the comfort and capability of their everyday rides without excessive modification.
You can watch our build-up of the Honda Talon 1000R, as well as a recap of the first video episode with Brent and Hale’s first impressions of the Talon, below. Keep reading for more insight into the parts and accessories we used and what we can look forward two in the next ride:
Engineered to Personalize
The first thing we noticed when bolting up the Honda-provided parts and accessories is that the Honda Talon 1000R is made to be personalized. Every one of the components we bolted on was well thought-out with near perfect fit and finish.
Brent was on-hand to help us bolt up all the parts and he commented numerous times how Honda’s engineers thought forward when developing the machine to fit these specific parts. There was little-to-no customizing, cutting or trimming required.
Honda Talon 1000R Accessory Instructions… Who Uses Instructions?
We do, actually! And you’re going to want to fire up your laptop for this. As it’s becoming more and more common for OEM’s to post installation instructions online, it’s always easier to have a big screen in the shop to see where the nuts and bolts go. Honda keeps all their parts and accessories information at http://shop.powersports.honda.com
We tried using our phones while elbows deep into the front bodywork while installing the accessory wiring harness but searching for the right set of instructions for the newest vehicles in the Honda lineup proved difficult. We needed to ensure we weren’t trying to install a Talon part with Pioneer instructions. This is where having the full-size screen of the laptop made sense. Plus, you can just print the instructions out if you want—that’s the easiest. However you access install instructions, take your time to ensure you are seeing the right parts in the schematics, and double-checking from vehicle to screen before making a move.
Honda Talon 1000R Accessories Lineup
We can categorize our choices in Honda Talon 1000R Accessories in three areas; Protection, Convenience and Performance. Here’s what we bolted on and tried out in the Arizona heat.
Honda Talon 1000R Chassis Protection Accessories
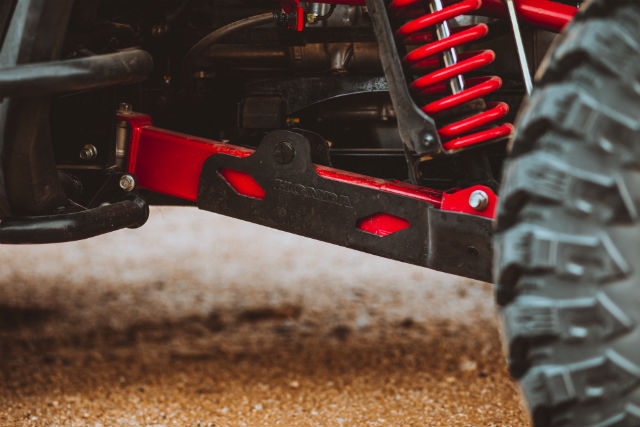
These rear trailing arm guards from Honda’s Accessories catalog are a solid investment.
Thanks to a proactive group in the Honda Media department, our test vehicle already came equipped with the front A-Arm Guards and beefy tubular nerf bars under the doors. We can’t imagine owning a SXS without something to help the A-Arms glide over rocks while crawling and to slow them from digging in and finding boulders on those heavy landings. The Honda accessory A-Arm guards are heavy-duty, .25 inch thick plastic units—our preferred material as they don’t stick to rocks and they are lighter than metal. Plus, they’re plenty strong to deflect the nasties.
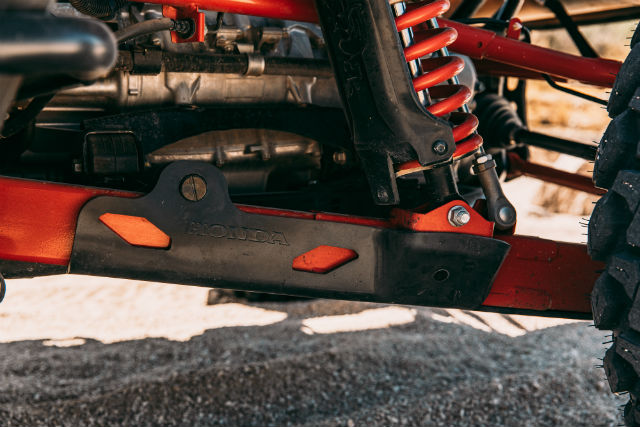
To complement the front, we added the rear Trailing Arm Guards from the catalog to the under carriage. Rear trailing arms are very vulnerable chassis components and will show pits and dings from front-wheel roost quickly. Plus, snagging one on a boulder or stump at high speeds without a glide plate is a recipe for repair. The Honda Trailing Arm Guards bolt on and cinch down with a unique clamp/rotating wedge and are made out of the same heavy plastic material as the A-Arm Guards. It’s sort of tricky to dial in the installation the first time, but once you understand how it works, the second side is a breeze.
Wind deflection up front was handled by the Half Windshield. This, too, was previously installed on the test Talon and, again, is something we highly recommend. Most of our experience with half windshields are better than full windshields for driving in the summer heat. And full windshields sometimes just create a vortex for dust to accumulate in. The half windshield from Honda fits great and works even better. It was clearly designed to be durable and fit so well with molded seals for a truly factory fit and finish.
Honda Talon 1000R Convenience Accessories
Unless you count the small glove box compartment, storage on the Honda Talon 1000R is non-existent. So, we ordered every bag Honda offered and strapped, buckled, and bolted them in place. The end result was a fully outfitted adventure rig with enough storage for a big day on the trail. Here are our thoughts on each bag:
Honda Talon Center Storage Bag
Nestled right between the two seats, the Honda Talon Center storage bag installed extremely quickly with a couple straps. There was no drilling or cutting necessary to the stock cab or seats and we didn’t have to drive in any brackets or buckles.
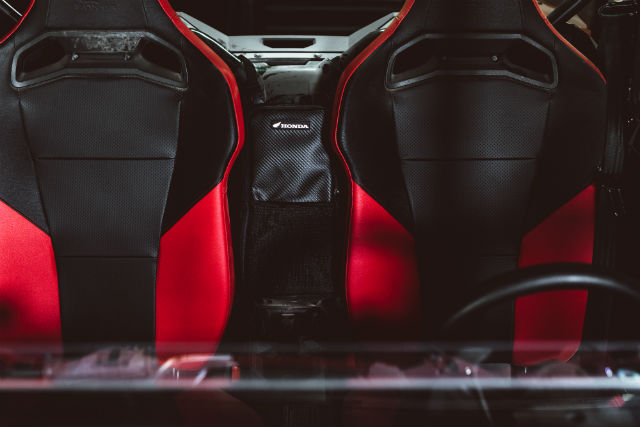
There are a lot of accessory storage options available for the Honda Talon.
The long bag is perfect for phones, snacks and a stuffed hat or two. It’s got plenty of room for in-the-cab essentials and could also easily hold radios and more. It’s surprisingly roomy and stood up to our days of abuse just fine.
Honda Talon Cargo Bag
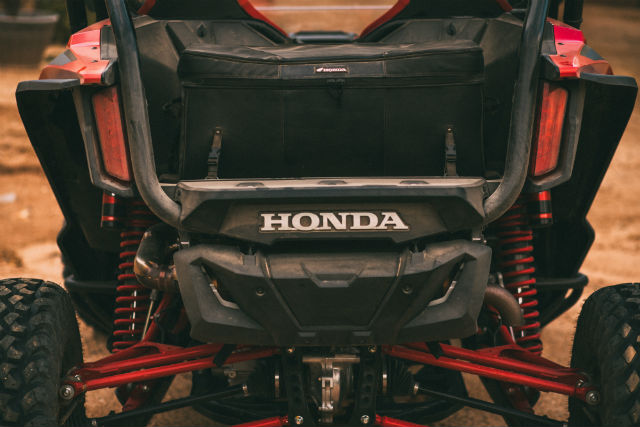
The rear cargo trunk bag is big enough for a couple helmets and lunch.
This is the big-daddy truck bag that nearly fills the entire rear cargo area of the Honda Talon. Again, this bag installs in a couple minutes using existing d-rings and included straps/buckles. The Cargo Bag is big—big enough for a couple helmets and goggles and gloves. Or, it’s the perfect place to stash a cooler like we did on the hot Arizona days. But really, this could be used for overnight trip luggage use or just hold ropes and recovery gear for more adventurous outings. It has a semi-rigid frame supporting the sides and lid and a similar divider that supports the center. We can see this support growing weaker over time, but for a clean looking rear cargo solution, it’s working well at holding necessities (like lunch!) and extra layers of clothing.
Honda Talon Corner Storage Bags
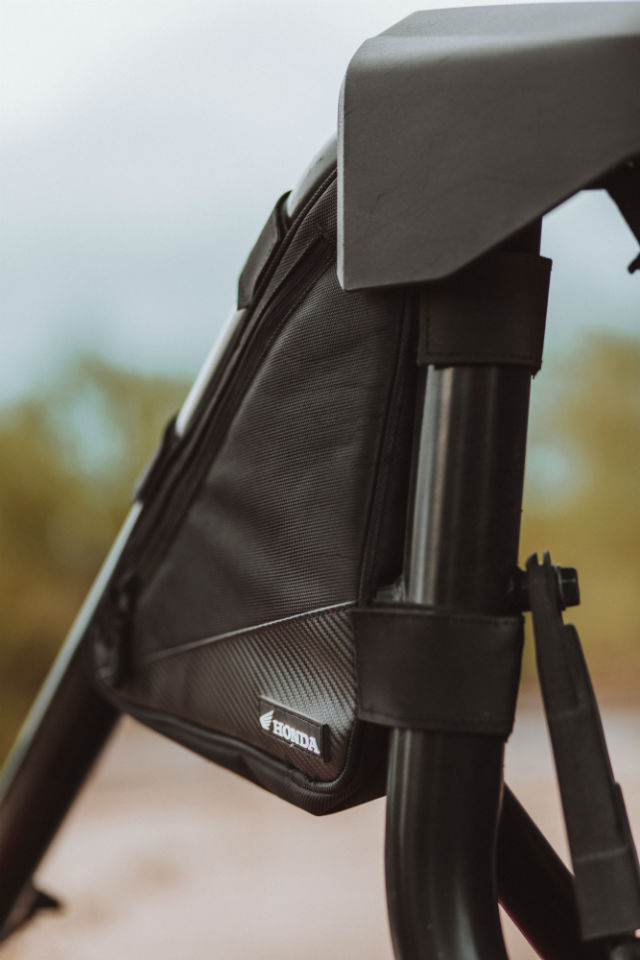
Easy-to-access corner storage bags keep smaller items up high where you can grab them from outside the vehicle with ease.
These little triangle bags attach to the perimeter cage of the Honda Talon right above and behind the driver and passenger’s heads. They hook-and-loop on to the tubes in a few seconds and have a nice-sized cargo capacity for such an out-of-the-way bag. You can’t install them wrong; they unhook off in an instant for washing the rig, and they can hold all sorts of things like headlamps and tire plug kits where you want them within easy reach, but not necessarily in the way of more used items. We’d keep heavier items down lower. These are simple and good-looking storage solutions utilizing area of the Honda Talon that otherwise goes to waste.
Honda Talon Side Mirrors
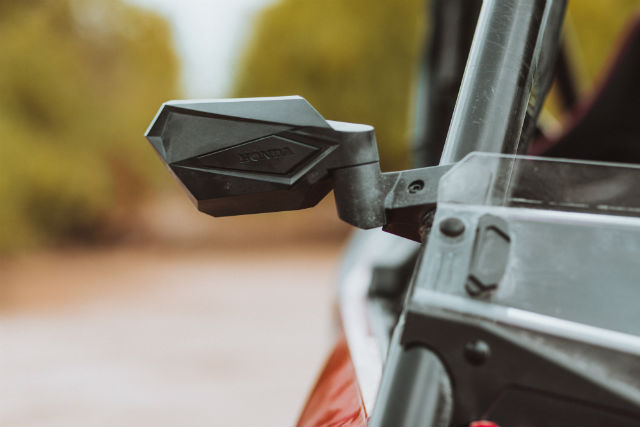
Looking back at all the great terrain and keeping an eye out on your party is easier with the Honda Talon mirrors.
The day will eventually come when SXS’s come stock from the factory with a full set of mirrors. Until then, we’ll continue to bolt them on and adjust to see those eating our dust. Honda’s Parts and Accessories division has some pretty solid clamp-on mirrors that worked surprisingly well. We’ve seen a lot worse out there. And the tension-controlled fold-away system means these aren’t necessarily disposable when you brush up against trail borders or hit the sand with them. We wish we had a wide-angle center mirror for more visibility for every ride and we wouldn’t be surprised if Honda added that to the catalog soon.
Honda Talon 1000R Performance Accessories
While we’re not modifying the suspension, engine or other performance segments of the Honda Talon 1000R in this story, we are adding some high-performance lighting and wheels and tires all the way around. Sure, the light bar can be a convenience accessory, but we like to think of nighttime visibility as a performance upgrade. And those wheels/tires? Clearly going bigger is better here, right?
Honda Talon 40-inch LED Light Bar

10K lumens of nighttime fun are on-tap with the 40-inch LED light bar.
Honda’s biggest light producing unit from their Parts and Accessories catalog for the Honda Talon is this 40-inch LED light bar. It produces 10,400 Lumens of night-cutting light mounted cleanly on top of the factory roof. It has a combination pattern—blasting spot and flood beams with 36 LEDs totaling 180 watts. It’s housed in a rugged, aluminum powder-coated housing and is rated for dust and water resistance.
Installation on the light bar is pretty easy, lining up the brackets and spacers to drill bolt holes through the plastic roof is the trickiest part of the install. Just make sure you have the bolts in the right order front-to-back and that the multi-part clamping system is lined up. You don’t want to cross these threads and deal with anything coming loose.
Honda Talon Accessory Wiring Harness, Switch Plate with Volt Meter
The hardest part about installing the light bar is plugging in the remote wiring harness and tying into the switch plate/harness that mounts in the dash. There are two parts here—the
Accessory Wiring Harness that goes to the battery, and a Switch Plate/Wire Harness with Volt meter.
Really, the only tricky part of the whole thing is reaching way up under the hood to the factory installed 12v socket. Here, you have to unplug the connector from the back of it, snap in the Accessory Harness, and re-plug the 12v power socket in. But, it’s all blind, and you’re working off feel. Our advice: study the plug on the accessory harness carefully and learn how it unclips out of the back of the 12v power socket in the dash, then replicate that by feel and pop it out. Everything else is just routing the pre-made harness around and through the vehicle to the battery box.
You will need a holesaw to pop the cables and grommet through the dash cubby hole before mounting the accessory Switch Plate, but that’s the only special tool needed. Once installed, all the accessories you can dream of will be easily wired in, and switched from, the on-dash Switch Plate. So, it’s a one-time hassle. For example, we can now install and power a winch to an on-dash switch in about ten or fifteen minutes.
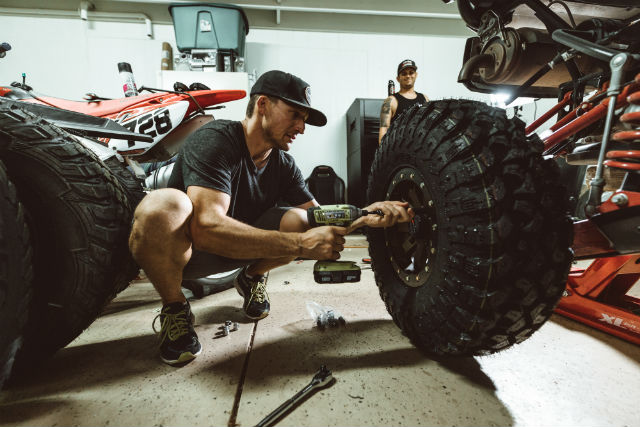
Honda Talon Wheels and Tires
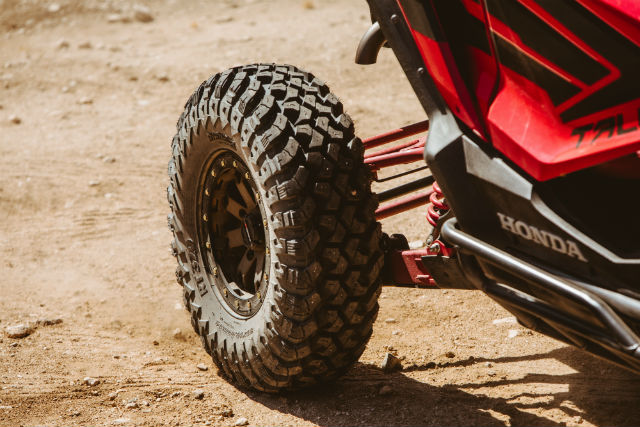
This tire/wheel combo from System 3 Racing is an awesome addition to the Honda Talon.
Our friends at System 3 Racing jumped on the opportunity to outfit our Real World Ride Honda Talon with a set of their brand-new, Honda Talon-specific SB-4 Beadlock bronze wheels.
System 3 has a reputation of building wheel and tire packages that fit right, and this is definitely true for these Honda Talon wheels. The crew at System 3 uses the same offsets Honda does in their stock wheel design to keep the original chassis balance in place. Plus, there are no spacers or weird wheel gimmicks to play with to get the Honda Talon to look just right. It just looks great right away. With these System 3 wheels, you’re getting a Honda Talon-specific system.
The tires we mounted up are also from System 3. These are their new RT320 Race & Trail tires in 30 x 10R-14 sizes all the way around. This squares up the front and rear of the Honda Talon’s wheel sizes from the stock sizing. The Honda Talon 1000R comes with 28 x 9-15 wheels up front and 28 x 11-15 out back.
The RT320 tires are designed to be high-performing SXS tires with an off-road truck-inspired tread pattern. The non-directional tires are ideal for all-terrain use and can cruise at low speeds just as well as they can blitz across the high-speed bumps. They provide a smooth, quiet ride on hardpack trails, as well as good traction in softer terrain. The System 3 RT320 tires should prove extremely durable in the long-run as they utilize System 3’s high-mileage rubber compound.
KLIM Helmets and Goggles
Helmet use is definitely standard operating procedure for any of us when driving a SXS. Safety takes priority, of course, but we also want to be comfortable. Not wanting to install a full air system on this project, we elected to go with a tried and true, high-quality off-road brand and they graciously offered to help us out. The crew at KLIM up in Idaho build some of the toughest and most intelligent apparel in the world. Their gear is designed to work with the human body by keeping it cooler when it’s hot and warmer when it’s cool.
For this test, we were going to the heat of Arizona so KLIM sent their crazy light F5 Helmet. The helmet comes in ECE or ECE/DOT approved versions to meet local riding regulations and all options incorporate an extremely light carbon shell with massive ventilation. It’s a very high-quality piece—the pinnacle in their lineup—and has incredibly wide field of vision so you won’t feel like you’re drowning in a helmet visually while enjoying a ride.

The KLIM F5 Helmet mates up perfectly to their Viper off-road goggle—a high-quality goggle that does a great job of keeping your eyes dust-free.
We prefer off-road-style helmets (unless we have an air system on-board) for the increased airflow and comfort for longer days in the heat. The KLIM-provided goods worked like a charm.
Communication System
Cardo sent us a cool new Bluetooth communication system to try out in the SXS market with this test and we got a lot of great feedback from Brent and Haley about the Cardo Packtalk Bold system. This system pairs to your smartphone and to other Cardo units for hands-free helmet-to-helmet communication. It allows direct, line-of-site connectivity to up-to 16 units. We have some hope of wireless communications making a big leap in the SXS space, and hopefully this one can be a great solution. Check out Brent and Haley’s comments in the final video coming soon.
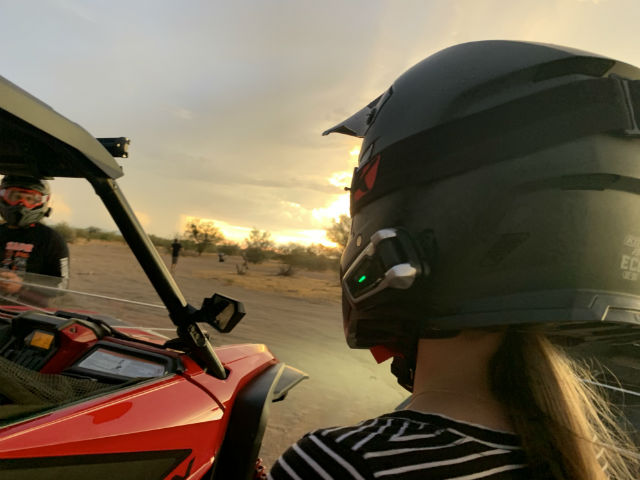
It’s communication time with the Cardo PackTalk Bold system.
The Sum of The Parts
That wraps up our accessorizing portion of the Real World Ride: Honda Talon, Tucson edition. We threw just about everything the Honda Parts and Accessories catalog had at the machine and added some nice parts on our own. We also outfitted Brent and Haley with some fresh KLIM gear and let them test the Cardo communication system.
Find out how all these parts worked in our next video and web story coming soon!
